

When I think of grilled pizzas, I think of the HBO show Girls. I really hate this to myself, but every time I serve, eat, or think about a pizza that was cooked on the grill, I hear Allison Williams say, “We bought the ingredients for grilled pizzas, and we wanted grilled pizzas do, and the day we were supposed to do that, he left me. “
I don’t know if it’s the Dunham association or the mundane desolation of that particular line, but this stupid show rocked the concept of pizza grilling for me for many years. This is of course very silly, because grilled pizzas are a lot of fun to prepare and eat. (I wish I could control my brain, but all I can do is limit his use of HBO, which I won’t.)
Grilling a pizza can be a bit stressful if you’ve never made one before. The best grilled pizzas are made with a very hot grill and the pizza dough turns brown pretty quickly. But just as I don’t let the HBO show “Girls” stop me from enjoying pizza hot and fresh from the grill, you won’t let fear stop you either. Now adopt some good pizza grilling habits and you will be rewarded with lovely grilled pizzas for years to come.
Let your dough get a little warm

G / O Media can receive a commission
I like to take my dough, which honestly is usually bought in the store, out of the fridge about half an hour before grill time so that it is easier to stretch and shape without tearing. (I didn’t do that the first time I made grilled pizzas, and those pizzas were littered with tiny holes.) If you’re making more than one pizza, take the second ball of dough out of the fridge about 15 minutes after the first one , otherwise it will be too warm, which will make it difficult to put it on the grill.
Once your dough is warmed up a bit, slowly stretch it, twisting it with each stretch, and stop if it looks translucent in some places. Take your time! Be nice to the dough! It’s the backbone of this entire operation.
Consider each topping carefully

With the exception of cheese and meat that has already been (usually cured), any topping that needs to be cooked, browned, or otherwise developed by heat must be cooked or browned beforehand. Mushrooms, for example, simply don’t have time to lose their moisture and brown properly during pizza cooking, and garlic won’t have a chance to soften.
Sausage, chicken and other raw animal proteins need to be cooked, of course, but so do vegetables, mushrooms and – if you’re a freak like me – pineapple. Grilling pineapples gives it a smoky, caramelized quality and brings out deeper flavors that mix really well with the overall grilled pizza experience. Paradoxically, I don’t grill the meat I combine with the pineapple. Instead, I drape thin slices of cold prosciutto over the hot pizza, which tastes really good but also protects the palate.

Really think about the flavors you want to get out of each topping and coax those flavors out of them before sprinkling them on cheeky batter. (Or, in the case of something like prosciutto, leave it out of the cooking process entirely.)
Also, be careful not to overdo it. Two toppings plus cheese are sufficient – more will make your pizza heavy and moist.
Mise is important
I don’t want to stress you out, but grilled pizzas favor what is (at least somewhat) prepared. Set up set up will make the process less stressful overall. In addition to pre-cooking toppings, make sure your sauce, cheese, olive oil, and any toppings are next to your grill. You’ll also need a ladle or large spoon (for the sauce), a batter or frying brush (for the oil), and a really large spatula (or pizza scoop) and tongs. I also like to put a small bowl of cornmeal on the bottom of the pizza for dusting.
Once you’ve got everything set up, you can work quickly and effectively, but if you’re still a little exhausted, take a page off Deb Perelman’s blog and take them off the grill after the first side is browned:
One of the most common things I’ve read about grilling pizza, and what I didn’t like most in the past, is that you have to be hyper-organized and ready to work quickly. I do not agree; Then I grill the first side if I don’t have enough space to spread it outside, put it back in, cover all the pizzas at a normal pace – set the table, toss the salad, etc. – and let it finish grilling when we are ready to eat.
Once you get used to the pace, you can do the whole thing on the grill, or you can do it Deb-style forever. Nobody is going to judge you, especially if you feed them pizza.
Bought in the store is fine
You can make your own batter and sauce.Smitten kitchen has excellent recipes for both – but there’s no shame in outsourcing it, especially when you get the hang of it. I usually grab both at Trader Joe’s, but almost all major grocery stores sell fresh pizza dough (look for it in the freezer section if you can’t find it chilled).
Make the grill hot

One of the great things about baking pizza on grill racks is that you can get super high temperatures in a short amount of time and you are outside so you don’t have to blow your home with the heat from your oven. A grill that is too cold will make a doughy pizza and nobody wants that, so turn it up. You should set up two heat zones – direct and indirect – with a pile of hot, glowing coals on one side of the grill (or have the burners turned up on one side if you are using gas).
You will be using the direct side to quickly sear both sides of the batter, which will start the cooking process, encourage some bubbles to form, and get some charcoal on the outside. (You don’t want all of the crust to bubble, but you can prick the center of the pizza beforehand with a fork, or just prick the bubbles as they form.)
Let’s make a pizza baby

To prepare grilled pizzas you will need:
- Pizza Dough (1 1-pound ball per pizza)
- Pizza Sauce (5 ounces per pizza)
- Cheese (I just like grated mozz, but check out our other suggestions Here.)
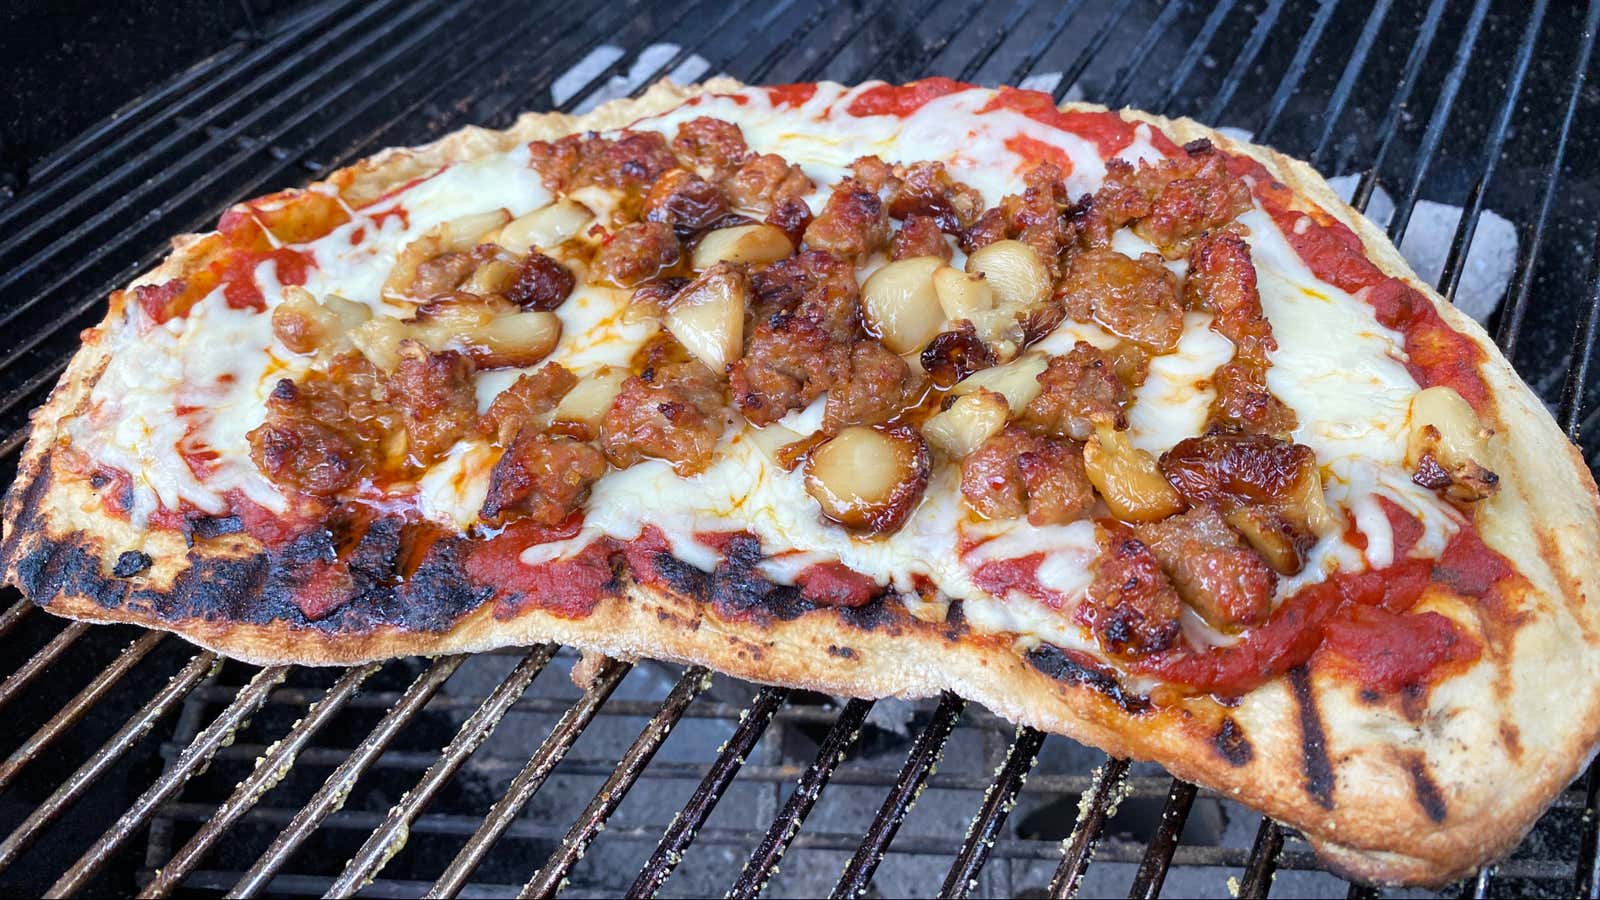
- Toppings of your choice (my favorites are grilled pineapple, uncooked prosciutto, air fryer roasted garlic, and hot Italian sausage.)
- Flour for rolling or stretching dough
- Cornmeal for dusting (optional)
About half an hour before grilling, take the dough out of the refrigerator and place on a surface dusted with flour. I use a large upside-down baking sheet because it’s easy to carry outside and I can slide the batter right off the sheet straight onto the grill. (You can also use a pizza scoop or lipless baking sheet.)
If you’re using a charcoal grill, fill your chimney and get it going. Once the coals are partially ashed, place them on one side of the grill, place the grill rack on top, and open the top and bottom vents fully and fully. A temperature of around 500 ° C is ideal and 450 ° C is fine, but keep in mind that when baking pizzas, the temperature will go down, so start with the higher side. If you’re using a gas grill, set your burners accordingly. (Use an external thermometer to monitor temperature no matter what type of grill you’re using.)

Stretch out your dough into a 10-12 inch circular shape and don’t worry if that shape isn’t perfectly round. My pizzas are usually in the shape of kidneys or the state of Alabama and that’s part of their charm. (Having a pizza pusher would likely help maintain the shape during the transfer, but I haven’t bought one yet for reasons unknown.)
Brush one side of the dough with a thin layer of olive oil, then slide the dough (oiled side down) onto the wire racks over the coals (or flames) and turn. Leave the grill open and let it cook for about a minute until it starts bubbling and you smell a little scorching (which is good). While it’s cooking, brush the top (which will soon become the bottom) with olive oil and dust with cornmeal.
After about a minute (at most) turn the dough over and pour the top with a single ladle of dough (more makes the pizza mushy), sprinkle the cheese and the rest of your toppings over it, then slide the whole thing over to the indirect heating side (the side without Coals), close the lid and let it cook for about five minutes, until the cheese is completely melted. (You can check it out after a few minutes if you’re nervous, but your nose is your most reliable tool – if it smells like it’s burning, it probably is.)
If you want a little more charcoal on the bottom of your crust, just slide it back over the coals for another minute. If you want the cheese to turn a little brownish – which the grill doesn’t do so well – beat it with a kitchen lamp. (You could use your broiler too, but that would bring some warmth in, which you sure don’t want, at least not now.)


