

Photo: Kuchina (Shutterstock)
A small tile project like a backsplash can be a DIY project – as long as you have the right tools. However, tile work – including this backsplash project – often requires a wet saw to accurately (and safely) cut the tile. A wet saw ensures an even jet of water over the blade to achieve smooth cuts and to reduce the amount of dust or dirt that would be created with heavy-duty cutting. Unfortunately, wet saws can go anywhere from about $ 100 to almost $ 300 to buy and can be a bit overwhelming for a beginner. If you’re not ready to take the plunge, there are other ways you can crop the tile for your project.
Here’s how to complete your next tile project – without using a wet saw.
How to use a manual tile cutter
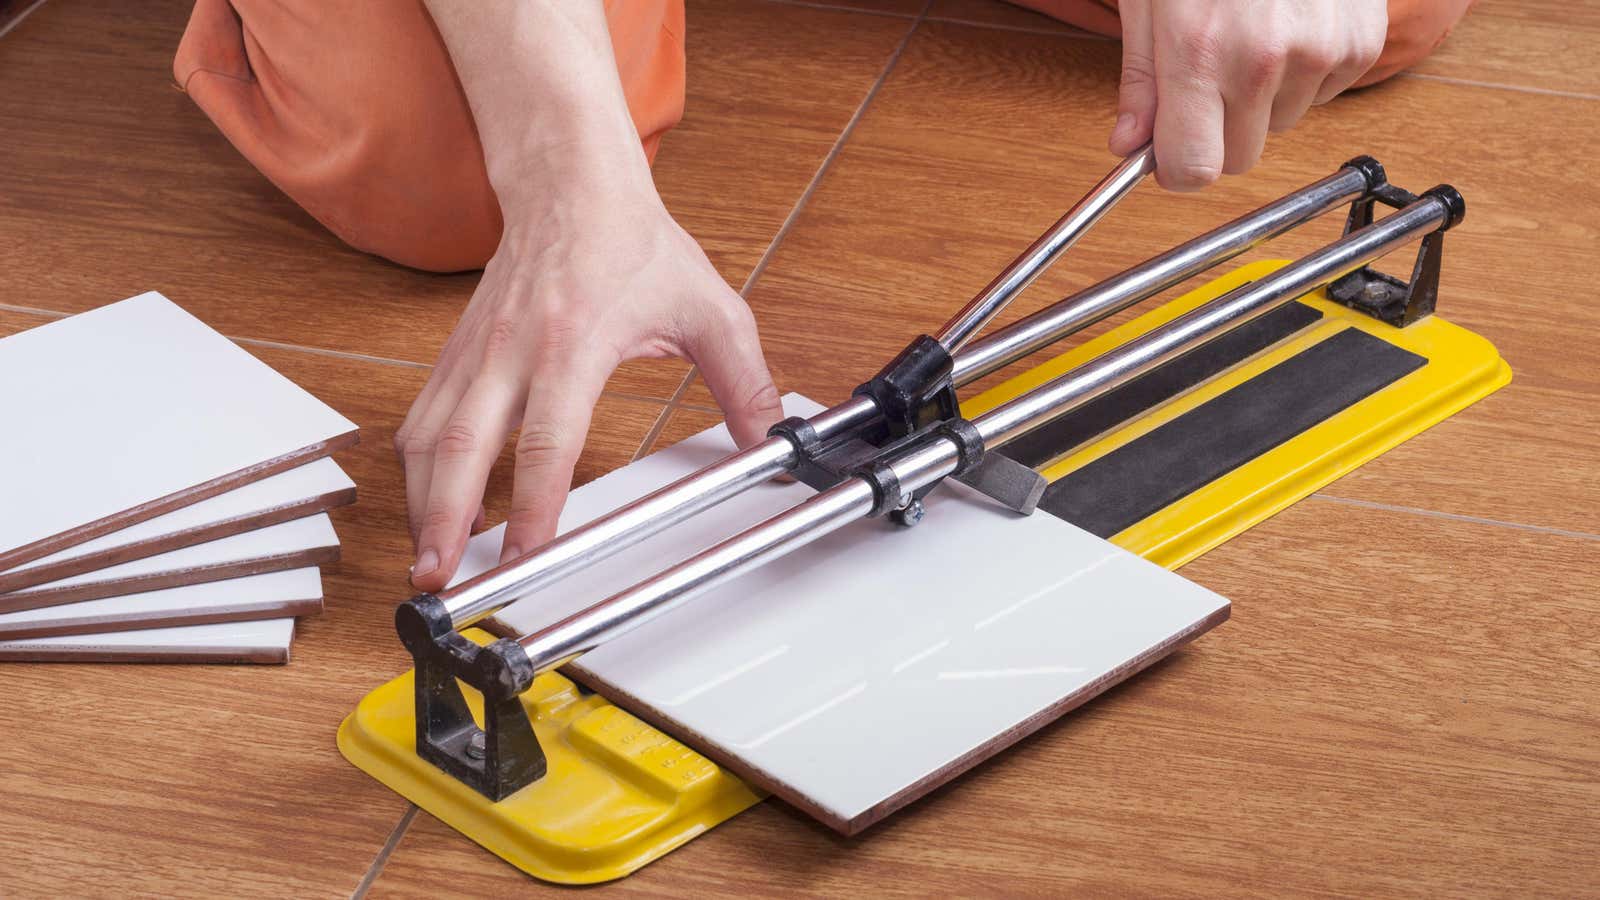
A manual cutter does the job for larger ruler cuts. Hand cutter Use scoring and pressure to snap the tile into place at the size you want. The cutter consists of a base to hold the tile, a handle bar on two metal rails that scores the tile, and a pressure plate that snaps it into two parts. They’re pretty cheap and cost around $ 25 for a medium quality cutter. If you want to cut thick porcelain or glass, a better equipped hand cutter costs approx $ 125.
Before you begin, the first thing to do is mark where you want to make your cut. Then place the tile on the cutter base and line it up with the small wheel blade attached to the handle bar. After aligning it, bring the handle down and push it forward so the blade runs along the tile marked for cutting. In this part of the process, the tile is not cut through, but cut deep enough for the next phase to break it down to size.
When you get to the end of the tile, press down on the handle to apply pressure (no pushing required; the metal plate breaks easily) and the tile will snap along the line you scratched. Clock For YouTuber see Jane Cut for a visual example of manual tile cutting.
After you’ve cut your tile, you may need a grindstone to smooth rough edges, but these are easy to find and inexpensive. This method is great for cutting porcelain and ceramic tiles in straight lines. Unfortunately, however, manual cutters cannot cut through stone or thick ceramic tile, and they cannot make small or curved cuts.
G / O Media can receive a commission
Using a glass cutter for tile projects
A glass cutter uses the same method as the manual cutter, but ironically, you apply manual pressure to break the tile itself. First, measure and mark the area to be cut with a pencil and a T-square or folding rule. Bob Vila recommends Move the T-square or ruler slightly away from the marking to make room for the cutter to hit the appropriate spot. Then run the cutter along the line using the T-square or folding rule as a guide to stay straight. Press down to hear the scraping sound of the blade hitting the tile to scratch it.
After you’ve scored the tile, take the other end of the glass cutter (which should have a small round ball on the end) and gently tap the underside of the tile along the scored line. This action will further weaken the line to allow for an even break. Then take a wire hanger or that Glass cutter himself and place it under the cutting line of the tile; the cutter or hangar will support the tile. You then press down on either side of the cut line to snap it into two parts.
A glass cutter is an inexpensive option, starting at just under five dollars, but similar to the manual cutter, this method only works with straight cuts and porcelain or glass tiles of medium thickness. If you want to make bevel cuts or smaller cuts for corners, you can a Tile tongs and rubbing stone.
Regardless of what you use, however, always wear safety glasses – tile scraps can be dangerous, especially if you’re using hand or glass cutters.


